genuinemails.com

Sabtu, 20 Februari 2010

Move a form does not have caption bar (Delphi)

To move a form that does not have a caption bar, add the following code in the onMouseDown event.

procedure TForm1.FormMouseDown(Sender: TObject; Button: TMouseButton; Shift: TShiftState; X, Y: Integer);
begin

ReleaseCapture;
SendMessage(Form1.Handle, wm_SysCommand,$f012,0);

end;

Read More......

Creating Splash Screen with Delphi

Splash screen is the view that we see the first time when we run an application. Splash screen is usually displayed to the user while reducing the saturation is still in the program initialization phase.

To make a splash scren the following way:

1. Create a main form first.
2. Add the form to be used as a splash screen (from the File menu, select New Form). Give it a name with FrmSplash form.
3. Add a timer component (located on the Win32 tab), give the name of the tmMainTimer.
4. Add the following code in onTimer events of the Timer component:

tmMainTimer.Enabled := False;

5. From the Project menu, select Options.
6. Move to the Forms tab.
7. From auto parts to create visible forms two forms. Select Form to be used as a splash screen and click the ">" to move the splash screen form to the Available forms.
8. If you already click OK.
9. Now from the View menu, select Project Source. In the main program make a splash screen form before initialization done.

For more details, see the following program snippet:

program Project1;

uses Forms,
Unit1 in 'Unit1.pas' {Form1},
Unit2 in 'Unit2.pas' {FrmSplash};

{$R *.RES}

begin
FrmSplash := TFrmSplash.Create(Application);
FrmSplash.Show;
FrmSplash.Update;
while FrmSplash.tmMainTimer.Enabled do Application.ProcessMessages;
Application.Initialize;
Application.CreateForm(TForm1, Form1);
FrmSplash.Hide;
FrmSplash.Free; // menghapus form splash scren dr memory
Application.Run;
end.

Read More......

Jumat, 19 Februari 2010

Access to external equipment via Parallel Printer Port Programable with delphi

Want to control external devices using a computer? Of great fun, especially with just a few lines of Delphi programs, we can turn on the lights, turn on the motor, set the robot arm or to access other electronic equipment.

Perhaps this paper can be quite nutritious snacks for the likes ngoprek Delphiers practical electronics, this is because we do not have to make a card I / 0 itself, but simply by using just a parallel printer port.

Parallel Printer Port
Port this one, certainly there on every computer. Reflected by its name, this time more parallel port used for printing business data. Actually, the program port can be used for anything else, because it has input / output (I / O) data.

Layout of the twenty-five-pin (DB 25) parallel printer port, shown in Figure 1.
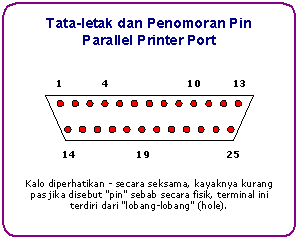
Figure 1. Pin layout parallel printer port.

The signal table and function of each pin on the parallel printer port, shown in Figure 2. From there known pin 2 s / d 9 (signal D0-D7) serves as the output, which then can we use to control external equipment.
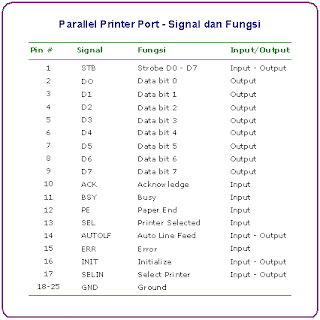
Figure 2. Signal and function of parallel printer port.

The Circuit

For the purposes of a second trial, we can connect the LED (Light emitting diode) through a resistor, output pins directly to the parallel printer port. It could also simply by measuring the voltage of 5 volts arise, when the data port in a high state.
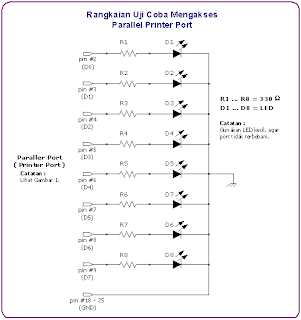
Figure 3. Scheme for testing while.

To be able to access a large burden and to prevent excessive loading on the parallel printer port, you should use a series of buffers (buffer).
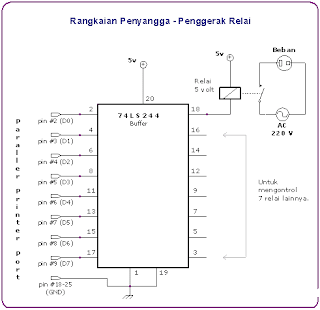
Figure 4. Buffer circuit.

From the scheme in Figure 4, visible pins 3,5,7,9,12,16 and 18
of the 74LS224 is connected to each relay. Next
switches on each relay is, can we use to
control equipment that has a big burden.

Delphi Program Code
Unlike Turbo Pascal or Delphi, where available functions 1 Port,
Delphi's 32 bit (version 2 s / d 6) that the function is not supported anymore.
Instead we use in-line assembler code.

Listing 1. Turn on the LED 5 from the circuit in Figure 3.

KirimDataKePort procedure (AlamatPort: Word; DataBit: Byte);
(* Address LPT1, range 378-37F hex
LPT2 address, range 278-37F hex
LPT3 address, range hex 3BC-3BF
see also the technical reference from Intel and Microsoft *)
asm
MOV DX, AlamatPort
MOV AL, DataBit
OUT DX, AL
end;

TForm1.btnLED5Click procedure (Sender: TObject);
begin
(* Sample calling KirimDataKePort procedures,
This will turn on the LED 5 (data bits-4 / 6 pin
of the circuit found in Figure 3. *)
KirimDataKePort ($ 378, $ 8); / / 00010000 binary
end;

Figure 5. Display control program, developed with Delphi.

In principle, to light the LED, we send binary data
8 bits to port. Customize this binary data transmission, with LED
who want lit.

For example, to light the first LED is 1 hex data
(binary; 0,000,001), whereas binary data 10,000,000
(80 hex / 128 dec) is used to light the LED eighth.
The following list, can be used as a reference.

DataPort Bit 0 = LED1 = 00000001 bin = 1 hex = 1 dec
DataPort Bit 1 = LED2 = 00000010 bin = 2 hex = 2 dec
DataPort Bit 2 = LED3 = 00000100 bin = 4 hex = 4 dec
DataPort Bit 3 = LED4 = 00001000 bin = 8 hex = 8 dec
DataPort Bit 4 = LED5 = 00010000 bin = 10 hex = 16 dec
DataPort Bit 5 = LED6 = 00100000 bin = 20 hex = 32 dec
DataPort Bit 6 = LED7 = 01000000 bin = 40 hex = 64 dec
DataPort Bit 7 = LED8 = 10000000 bin = 80 hex = 128 dec


For those who want to experiment, Listing 2 is the program code
Application example from the controller as shown in Figure 5.

Listing 2. Controller application program code.

unit Unit1;

interface

uses
Windows, Messages, SysUtils, Classes, Graphics, Controls,
Forms, Dialogs, Buttons, ExtCtrls, StdCtrls;
type
TForm1 = class(TForm)
SpeedButton1: TSpeedButton;
SpeedButton2: TSpeedButton;
SpeedButton3: TSpeedButton;
SpeedButton4: TSpeedButton;
SpeedButton5: TSpeedButton;
SpeedButton6: TSpeedButton;
SpeedButton7: TSpeedButton;
SpeedButton8: TSpeedButton;
Bevel1: TBevel;
Bevel2: TBevel;
lblDataPortBit: TLabel;
lblNoLED: TLabel;
Label1: TLabel;
Label2: TLabel;
Label3: TLabel;
procedure
SpeedButton1Click(Sender: TObject);
procedure
FormCreate(Sender: TObject);
private
procedure
KirimDataKePort(DataPortBit: Byte);
public
{ Public declarations }
end
;

var
Form1: TForm1;

implementation

{$R *.DFM}

uses
Math;

const
AlamatPort = $378;

procedure
TForm1.KirimDataKePort(DataPortBit: Byte);
var
Nilai: Byte;
begin
lblDataPortBit.Caption := IntToStr(DataPortBit);
lblNoLED.Caption := 'LED No. ' + IntToStr(DataPortBit + 1) +
' Nyala';
Nilai := Trunc(Power(2, DataPortBit));
asm
MOV DX, AlamatPort
MOV AL, Nilai
OUT DX, AL
end
;
end
;

procedure
TForm1.SpeedButton1Click(Sender: TObject);
begin
(* Put the 8 pieces TSpeedButton, set propeti Tag
of 8 with the value TSpeedButton
0 to 7. From the Object Inspector,
directed event Clik from all TSpeedButton
the SpeedButon1Click. *)


KirimDataKePort((Sender as TSpeedButton).Tag);
end
;

procedure
TForm1.FormCreate(Sender: TObject);
begin
KirimDataKePort(0);
end
;

end
.

Read More......

Kamis, 18 Februari 2010

Tips and trick (part 2)

Source Code for Validation Program using Visual Basic 6.o, If you tertatik Tips and Tricks with Visual Basic is Please Read below ...

Only numbers can be input in TextBoxt :

Private Sub txtNomor_KeyPress(KeyAscii As Integer)
If Not (KeyAscii >= Asc("0") & Chr(13) _
And KeyAscii <= Asc("9") & Chr(13) _
Or KeyAscii = vbKeyBack _
Or KeyAscii = vbKeyDelete _
Or KeyAscii = vbKeySpace) Then
Beep
KeyAscii = 0
End If
End Sub

Only Letter :

Private Sub txtNama_KeyPress(KeyAscii As Integer)
If Not (KeyAscii >= Asc("a") & Chr(13) _
And KeyAscii <= Asc("z") & Chr(13) _
Or (KeyAscii >= Asc("A") & Chr(13) _
And KeyAscii <= Asc("Z") & Chr(13) _
Or KeyAscii = vbKeyBack _
Or KeyAscii = vbKeyDelete _
Or KeyAscii = vbKeySpace)) Then
Beep
KeyAscii = 0
End If
End Sub

All cleaning TextBox Control and Combo Box :

Sub Clear()
For Each Control In Me.Controls
If TypeOf Control Is TextBox Then
Control.Text = ""
End If
If TypeOf Control Is ComboBox Then
Control.Text = ""
End If
Next Control
End Sub

NB: if there is another key condition plus live in IFnya aja, and to disable all the buttons to stay instead of "Control.Text = Enabled" wrote

Get Auto Number :

Private Sub Auto()
Dim Urutan As String * 10
Dim Tgl As String
Dim Hitung
Set TMasuk = New ADODB.Recordset
TMasuk.Open "Select * from Masuk", Persediaan, adOpenDynamic, adLockPessimistic
'TMasuk.MoveFirst
Tgl = Format(Now, "yy/mm/dd")
With TMasuk
If .RecordCount = 0 Then
Urutan = Right(Tgl, 2) + Mid(Tgl, 4, 2) + Left(Tgl, 2) + "0001"
Else
.MoveLast
If Left(![No Masuk], 6) <> Right(Tgl, 2) + Mid(Tgl, 4, 2) + Left(Tgl, 2) Then
Urutan = Right(Tgl, 2) + Mid(Tgl, 4, 2) + Left(Tgl, 2) + "0001"
Else
Hitung = (![No Masuk]) + 1
Urutan = (Right(Tgl, 2) + Mid(Tgl, 4, 2) + Left(Tgl, 2)) + Right("0000" & Hitung, 4)
End If
End If
txtNomor = Urutan
End With
End Sub

Read More......

Rabu, 17 Februari 2010

Tips and trick (part 3)

Knowing is connected to the Internet or not :

Public Declare Function InternetGetConnectedStateEx Lib “wininet.dll” Alias “InternetGetConnectedStateExA” _
(ByRef lpdwFlags As Long, _
ByVal lpszConnectionName As String, _
ByVal dwNameLen As Long, _
ByVal dwReserved As Long _
) As Long

Public Enum EIGCInternetConnectionState
INTERNET_CONNECTION_MODEM = &H1&
INTERNET_CONNECTION_LAN = &H2&
INTERNET_CONNECTION_PROXY = &H4&
INTERNET_RAS_INSTALLED = &H10&
INTERNET_CONNECTION_OFFLINE = &H20&
INTERNET_CONNECTION_CONFIGURED = &H40&
End Enum

Public Property Get InternetConnected( _
Optional ByRef eConnectionInfo As EIGCInternetConnectionState, _
Optional ByRef sConnectionName As String _
) As Boolean
Dim dwFlags As Long
Dim sNameBuf As String
Dim lR As Long
Dim iPos As Long
sNameBuf = String$(513, 0)
lR = InternetGetConnectedStateEx(dwFlags, sNameBuf, 512, 0&)
eConnectionInfo = dwFlags
iPos = InStr(sNameBuf, vbNullChar)
If iPos > 0 Then
sConnectionName = Left$(sNameBuf, iPos – 1)
ElseIf Not sNameBuf = String$(513, 0) Then
sConnectionName = sNameBuf
End If
InternetConnected = (lR = 1)
End Property

Read More......

Tips and trick (part 1)

This section provides various tips and tricks used to apply programming in Visual Basic version 6.0.

Character Password (*)

You must already know that in certain applications that use passwords, text boxes are used to fill the password always bring the star character (*) if you type something into it. This of course meant that no one else can read the actual characters you type. To create a text box to remove the character * (or even other characters) is very easy to do, namely to fill in the characters you want on the property PasswordChar text box control. After that if you type something into the text box, then the characters that will appear is the character that you enter into the PasswordChar property.


Center Screen

Often if your application is run, the location of the application form on the monitor screen is not settled. Sometimes on the top left, sometimes in the middle, sometimes at the bottom. For those of you who like cleanliness, maybe this will seem annoying. There is an easy trick for an application form are always situated in the middle of the screen, if executed, that is by changing the properties StartUpPosition into 2 - CenterScreen, or form an image right click on the Form Layout window, select Startup Screen Position ® Center.


Default Size Control

To add a control to the form, you use click and drag the mouse to form the control in the form. If you want to use a control with the default size, then there is a faster way, ie double-click the control icon. Automatically in the form will be added to control the default size. While the position of course still have to set it manually.

If you are a Visual Basic user starting from the early versions, you must know that the display IDE (Integrated Development Environment) or the display window of the Visual Basic 6.0 differs from previous versions. You can change the look of the IDE Microsoft Visual Basic 6.0 to resemble the previous versions by clicking Tools ® Options menu. Select the Advanced tab, enable the check box SDI Development Environment. Exit the Visual Basic 6.0, then run again. Display the Visual Basic 6.0 IDE will change


Adding Images In the Command Button

So far, you always use the Caption on the Command Button. You can also add pictures on the Command Button to add your application appeal. For that there are some properties that need to be changed, namely:

Property Value

Style 2 - Graphical

Caption [You can clear these properties]

Picture [Pictures to be added to the Command Button]

DownPicture [Image in Command Button when clicked]

Example:

Make a form, add a Command Button and change its properties as follows:

Property: Value

Style: 2 - Graphical

Caption: [blank]

Picture: C: \ Windows \ Cursors \ No_l.cur

DownPicture: C: \ Windows \ Cursors \ No_m.cur

For Picture and DownPicture property, if the cursor files are given in the example does not exist on your computer, you can replace yourself with another file.

Run your application, consider what happens if the Command Button is clicked.


PopUp Menu

Sometimes you want to display a menu by right-clicking on an object. Menu like this is called PopUp Menu. It's easy. Make a menu with the menu editor, then turn off options that are visible in the dialog box editor menu. That must be considered is, the choice is only visible to non-active menutitle its course, while for each menuitem, this visible option must remain active. Then use the mouse down event on the object you want to show the PopUp Menu, then add the following syntax:

PopUpMenu menutitle

Remember, by using the mouse down event, which mouse button is clicked can be captured by taking a particular value of the parameter button. To the right mouse button, button parameter value is 2.

Example:

Make a form, add menus and Picture Box control into it. Fill up the menu and your image. Do not forget to disable the check box visible in the menu editor to menutitle it. In the picture box control to add code as in listing 1.

Listing 1. MouseDown Event in Picture1

Private Sub Picture1_MouseDown (Button As Integer, Shift As Integer, X As Single, Y As Single)

If Button = 2 Then

PopupMenu mnuFile

End If

End Sub

Run the application. A menu will appear when you right-click the Picture Box control.


Editing Some Controls Together

To edit multiple controls at once, using a combination of shift + click or ctrl + click to activate the option on some controls.

For example, consider Figure 2. In the drawing, the three Command Button on the form are located too close to the left. To move to the middle of all three at once, select the Command Button is third with a combination of shift + click or ctrl + click. After that you can move the control all three at once.


Tab Order

Sometimes for one thing we can not use the mouse in operating an application, such as the mouse is defective. So we had to use the keyboard in running an application. Or maybe our application is an application used in the store cashier who was deliberately not given a mouse. In circumstances where we have to use the keyboard, then to move from one control to another control that we use the tab key. For it in designing a form, we also need to adjust the control sequence to be active if the tab key is pressed. To set the sequence very simple way, namely by adjusting the TabIndex property of each control. Which directly controls the focus if the application is run will have a TabIndex 0, then if we hit the tab key, then the next active control with TabIndex is 1, and so on.

For certain cases, the use of the tab key to move from one control to another control is not efficient, and to replace the desired tab button enter key. To replace the tab key to enter, the tricks that can be used is to use the KeyPress event. KeyAscii value to enter is 13. If the value is met keyAscii 13, then the next control that wants to become the focus should be subject setfocus methods.


Adding a Control Array In The Run-Time

Generally we add controls to the form when designing these forms (at design time), but Visual Basic also provides the facility to increase the number of control array at run-time by using the Load statement.

Example:

Make a form and add a Command Button. Change property Indexnya with numbers 0.

Into the Command Button is added as the program code listing 2.

Listing 2. Click on Command1 Event

Private Sub Command1_Click (Index As Integer)

Load Command1 (1)

Command1 (1). Left = Command1 (0). Left

Command1 (1). Top = Command1 (0). Top + Command1 (0). Height

Command1 (1). Caption = "New Command"

Command1 (1). Visible = True

End Sub

Note that the procedures have Command1_Click Index As Integer parameters that must be added.

Run the application. If the Command Button is clicked, it automatically added a new Command Button directly below.

Well, hopefully the tips and tricks for helping you to create applications with Visual Basic.

Read More......

Selasa, 16 Februari 2010

KNOWN VISUAL BASIC (Part 6)

1.1. Creating Project Manage Property

Example 5:

Create a new project with StandardEXE to try playing with the property and the event even further. Add Label components, Text, Frame, OptionButton, checkbox and Command. Set looks like Figure 2.7 below:

Figure 2.7. Example 2.2 preview exercises


When using the display in the frame, the frame must be made in advance of new components in it. Set the properties of each component such as table 2.2. follows:
Table 2.2 Settings 2.2 exercise property

These settings will be generated display applications such as in Figure 2.8 below.
Figure 2.8. Display for exercise 2.2

Click on the command1, add code so that the program becomes:

Private Sub Command1_Click ()

Label2.Caption = Text1.Text

End Sub

Click on command2, add code so that the program becomes:

Private Sub Command2_Click ()

End

End Sub

Click on Option1, add code so that the program becomes:

Private Sub Option1_Click ()

Label2.ForeColor = vbRed

End Sub

Label2.ForeColor is color property to change the text on Label2, and red vbRed is already provided by Visual Basic, for the other colors like blue using vbBlue. Click on Option2, add code so that the program becomes:

Private Sub Option2_Click ()

Label2.ForeColor = vbBlue

End Sub

Click on check1, add code so that the program becomes:

Private Sub Check1_Click ()

Label2.FontItalic = Check1.Value

End Sub

Click on check2, add code so that the program becomes:

Private Sub Check2_Click ()

Label2.FontBold = Check2.Value

End Sub

Label2.FontItalic the property to set whether the text in italics Label2 made or not, if the value True then the text into italics. Label2.FontBold the property to set whether the text in bold Label2 made or not, if the value True then the text becomes bold. Save the project with the name projectLatihan22. And run the program, enter the name of Achmad Basuki, set the text to be red and tilted like a picture 2.9.2.8. Display for exercise 2.2

Read More......

Senin, 15 Februari 2010

Creating Media Player

You can create various multimedia applications in VB that could play audio CD, audiofiles, VCD , video files and more.


To be able to play multimedia files or multimedia devices, you have to insert Microsoft Multimedia Control into your VB applications that you are going to create. However, Microsoft Multimedia Control is not normally included in the startup toolbox, therefore you need to add the MM control by pressing Ctrl+T and select it from the components dialog box that is displayed.

19.1 Creating a CD player

In this program, you can create a CD player that resembles an actual CD player. It allows the user select a track to play, to fast forward, to rewind and also to eject the CD. It can also display the track being played. The interface and code are shown below


The Code

Private Sub Form_Load()
'To position the page at the center
Left = (Screen.Width - Width) \ 2
Top = (Screen.Height - Height) \ 2
'Initialize the CD
myCD.Command = "Open"

End Sub


Private Sub myCD_StatusUpdate()


'Update the track number
trackNum.Caption = myCD.Track
End Sub

Private Sub Next_Click()
myCD.Command = "Next"
End Sub

Private Sub Play_Click()
myCD.Command = "Play"

End Sub

Private Sub Previous_Click()
myCD.Command = "Prev"
End Sub

Private Sub Stop_Click()
myCD.Command = "Stop"
End Sub

Source : http://www.vbtutor.net

Read More......

KNOWN VISUAL BASIC (Part 5)

1.1. Event With Program Code

Visual programming is event-driver, which means that the program works based on events that occur when a given object instance action button is pressed, the selected option, or after typing something in the text and in the press [Enter]. To make this event live click on the components of the user interface display that was made.

Example 3:

In the example 2, click on the form (the blanks are not used any other components), then the display will appear as shown below 5:

Figure 2.5. Display for program code

Consider drawing 2.5, while in-form will appear click the Load event, is due to the default event for the form is loaded. And automatically in the source code for functions already provided in the form load event is written:

Private Sub Form_Load ()

End Sub

In this function written in program code. This program code is run when the form is called. This event can be replaced in the [Event], note that the event in every component, including numerous forms, live selected according to application needs.

Example 4:

In the example 2, click on the command1, hence the event on the program code as follows:

Private Sub Command1_Click ()

End Sub

Add the program to the source code is that it becomes:

Private Sub Command1_Click ()

Label2.Caption = Text1.Text

End Sub

This program means that what is typed in text1 will be displayed at Label2. Then click on command2, and add code so that the program becomes:

Private Sub Command2_Click ()

End

End Sub

End command, meaning the program out and completed. Save the form and this project by way of select menu [File]>> [Save Project], give the name of the form and name of the project formLatihan21 with projectLatihan21. Run by pressing the Run icon () on the toolbar. Enter a name such as "Achmad Basuki" in text1, and press the Ok button. The result is as Figure 2.6 berikut.2.5. Display for program code
Figure 2.6. The results of the exercise program 2.1

Read More......

Minggu, 14 Februari 2010

Download e-book

Tutorial VB connect to MySQl
Tutorial VB for Beginner (Indonesian Language)

Read More......

KNOWN VISUAL BASIC (Part 4)

1. EVENTS AND PROPERTY

1.1. Creating User Interface

Programming Visual Basic is a visual programming, where it conducted the program using visual media, or often referred to as user-interface. Which means that creating the program generated by the program view, the program code (scripts) are placed each component.

Example 1:

Create a new project with StandartEXE to make a simple user interface with components involving Label, Textbox and a CommandButton on the Toolbox on the left side of the interface such as Visual Basic 2.1 and image Figure 2.2 below:


Figure 2.1. Components used

Use the components as in Figure 2.1 to create a form in the figure 2.2. follows:

Figure : 2.2
To set the location live using "drag & drop" with the mouse. This program is not finished because it is still necessary arrangements and additional event properties in each component to provide an acceptable display by the user and can run the process.

1.1. Set the Property

Property on the display the Visual Basic interface is located on the right, as Figure 2.3 below:

Figure 2.3

In example 1 above, the components used are Label1, Label 2, text1, Command1 and Command2. Set the properties of each component is as follows, thus producing an image display as 2.4. Table 2.1. Property settings for example 2 :

Results form after the set is propertynya:
Figure 2.4. Results show an example form 2

Each component has different properties and numerous, but there are some properties that are often used in each component, among others [Caption]. Property is often used to form include:

• Name: declare the name of the object is a very useful form to call and save the form.

• Caption: used to give the title to the form.

• StartUpPosition: used to put the form when the form is called or active. There are four choices are: Manual, CenterOwner, CenterScreen, Windows Default,


Read More......

BlogCatalog

My Sponsor