genuinemails.com

Rabu, 03 Maret 2010

check whether a file exists in a particular directory

To check whether a file exists in a particular directory, you can use the provided functions in Delphi.
Formula functions:
FileExists (const FileName: string): boolean.
The first step: Lay and Edit Button in the Form
Step two: fill the program with the program listing below

Procedure Tfrom.Button1Click(Sender:TObject);
begin
if Edit1.Text = ' ' then
ShowMessage('isikankan nama file yang dicari')
else
begin
if FileExits(Edit1.Text) = true then // jika ada
ShowMessage('file " ' +Edit1.Text + ' " ada. ')
else // Jika tidak ada
showMessage('File " ' +Edit1.Text + ' " tidak dtemukan. ');
end;
end;
step 3 : Klik Run

Read More......

changing background windos Explorer toolbar with a bitmap image

This program describes the changing background windos Explorer toolbar with a bitmap image. Made this very simple program, which provides data on key BackBitmapShell value HKEY_CURRENT_USER \ Software \ Microsoft \ Internet Explorer \ toolbar and value is a bitmap file path is used.
Fom design on 2 Button and take poperty Dialogue with OpenPictureDialog, and also EditText

This complete program listing :

Procedure Tform1.Button1Click(Sender:TObject);
begin
if OpenPictureDialog1.Execute then
Edit1.Text:=OpenPicutreDialog1.FileName;
end;

Procedure Tfrom1.Button2Click(Sender:TObject);
var Register:Tregister;
begin
Register:=Tregister.create;
Register.RootKey:=HKEY_CURRENT_USER;
try
try
Register.OpenKey('\Software\Microsoft\Internet Explorer\'+ 'Toolbar',True);
Register.WriteString('BackBitmapShell',Edit1.Text);
ShowMessage('Berhasil mengubah background toolbar'+#13+'Untuk melihat hasilnya,buka'+
' "Windows Explorer" baru.');
Except on ERegistryException do
ShowMessage('Gagal mengubah background toolbar explorer');
end;
Finally
Register.CloseKey;
Register.Free;
end;

Read More......

Sabtu, 20 Februari 2010

Move a form does not have caption bar (Delphi)

To move a form that does not have a caption bar, add the following code in the onMouseDown event.

procedure TForm1.FormMouseDown(Sender: TObject; Button: TMouseButton; Shift: TShiftState; X, Y: Integer);
begin

ReleaseCapture;
SendMessage(Form1.Handle, wm_SysCommand,$f012,0);

end;

Read More......

Creating Splash Screen with Delphi

Splash screen is the view that we see the first time when we run an application. Splash screen is usually displayed to the user while reducing the saturation is still in the program initialization phase.

To make a splash scren the following way:

1. Create a main form first.
2. Add the form to be used as a splash screen (from the File menu, select New Form). Give it a name with FrmSplash form.
3. Add a timer component (located on the Win32 tab), give the name of the tmMainTimer.
4. Add the following code in onTimer events of the Timer component:

tmMainTimer.Enabled := False;

5. From the Project menu, select Options.
6. Move to the Forms tab.
7. From auto parts to create visible forms two forms. Select Form to be used as a splash screen and click the ">" to move the splash screen form to the Available forms.
8. If you already click OK.
9. Now from the View menu, select Project Source. In the main program make a splash screen form before initialization done.

For more details, see the following program snippet:

program Project1;

uses Forms,
Unit1 in 'Unit1.pas' {Form1},
Unit2 in 'Unit2.pas' {FrmSplash};

{$R *.RES}

begin
FrmSplash := TFrmSplash.Create(Application);
FrmSplash.Show;
FrmSplash.Update;
while FrmSplash.tmMainTimer.Enabled do Application.ProcessMessages;
Application.Initialize;
Application.CreateForm(TForm1, Form1);
FrmSplash.Hide;
FrmSplash.Free; // menghapus form splash scren dr memory
Application.Run;
end.

Read More......

Jumat, 19 Februari 2010

Access to external equipment via Parallel Printer Port Programable with delphi

Want to control external devices using a computer? Of great fun, especially with just a few lines of Delphi programs, we can turn on the lights, turn on the motor, set the robot arm or to access other electronic equipment.

Perhaps this paper can be quite nutritious snacks for the likes ngoprek Delphiers practical electronics, this is because we do not have to make a card I / 0 itself, but simply by using just a parallel printer port.

Parallel Printer Port
Port this one, certainly there on every computer. Reflected by its name, this time more parallel port used for printing business data. Actually, the program port can be used for anything else, because it has input / output (I / O) data.

Layout of the twenty-five-pin (DB 25) parallel printer port, shown in Figure 1.
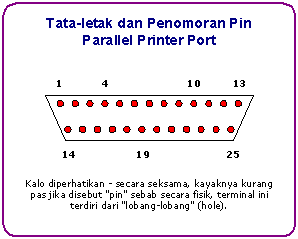
Figure 1. Pin layout parallel printer port.

The signal table and function of each pin on the parallel printer port, shown in Figure 2. From there known pin 2 s / d 9 (signal D0-D7) serves as the output, which then can we use to control external equipment.
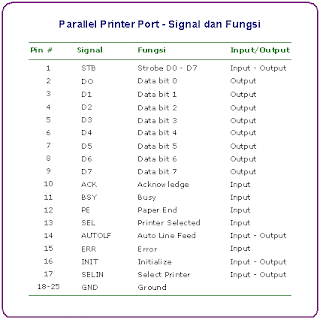
Figure 2. Signal and function of parallel printer port.

The Circuit

For the purposes of a second trial, we can connect the LED (Light emitting diode) through a resistor, output pins directly to the parallel printer port. It could also simply by measuring the voltage of 5 volts arise, when the data port in a high state.
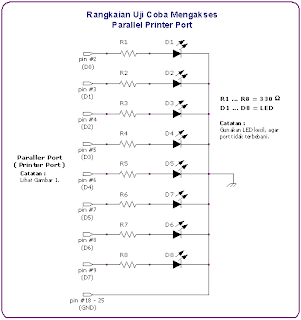
Figure 3. Scheme for testing while.

To be able to access a large burden and to prevent excessive loading on the parallel printer port, you should use a series of buffers (buffer).
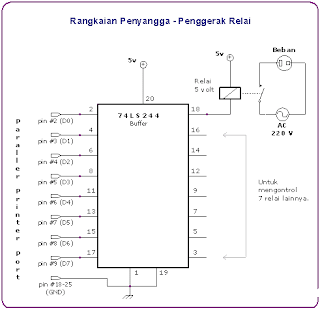
Figure 4. Buffer circuit.

From the scheme in Figure 4, visible pins 3,5,7,9,12,16 and 18
of the 74LS224 is connected to each relay. Next
switches on each relay is, can we use to
control equipment that has a big burden.

Delphi Program Code
Unlike Turbo Pascal or Delphi, where available functions 1 Port,
Delphi's 32 bit (version 2 s / d 6) that the function is not supported anymore.
Instead we use in-line assembler code.

Listing 1. Turn on the LED 5 from the circuit in Figure 3.

KirimDataKePort procedure (AlamatPort: Word; DataBit: Byte);
(* Address LPT1, range 378-37F hex
LPT2 address, range 278-37F hex
LPT3 address, range hex 3BC-3BF
see also the technical reference from Intel and Microsoft *)
asm
MOV DX, AlamatPort
MOV AL, DataBit
OUT DX, AL
end;

TForm1.btnLED5Click procedure (Sender: TObject);
begin
(* Sample calling KirimDataKePort procedures,
This will turn on the LED 5 (data bits-4 / 6 pin
of the circuit found in Figure 3. *)
KirimDataKePort ($ 378, $ 8); / / 00010000 binary
end;

Figure 5. Display control program, developed with Delphi.

In principle, to light the LED, we send binary data
8 bits to port. Customize this binary data transmission, with LED
who want lit.

For example, to light the first LED is 1 hex data
(binary; 0,000,001), whereas binary data 10,000,000
(80 hex / 128 dec) is used to light the LED eighth.
The following list, can be used as a reference.

DataPort Bit 0 = LED1 = 00000001 bin = 1 hex = 1 dec
DataPort Bit 1 = LED2 = 00000010 bin = 2 hex = 2 dec
DataPort Bit 2 = LED3 = 00000100 bin = 4 hex = 4 dec
DataPort Bit 3 = LED4 = 00001000 bin = 8 hex = 8 dec
DataPort Bit 4 = LED5 = 00010000 bin = 10 hex = 16 dec
DataPort Bit 5 = LED6 = 00100000 bin = 20 hex = 32 dec
DataPort Bit 6 = LED7 = 01000000 bin = 40 hex = 64 dec
DataPort Bit 7 = LED8 = 10000000 bin = 80 hex = 128 dec


For those who want to experiment, Listing 2 is the program code
Application example from the controller as shown in Figure 5.

Listing 2. Controller application program code.

unit Unit1;

interface

uses
Windows, Messages, SysUtils, Classes, Graphics, Controls,
Forms, Dialogs, Buttons, ExtCtrls, StdCtrls;
type
TForm1 = class(TForm)
SpeedButton1: TSpeedButton;
SpeedButton2: TSpeedButton;
SpeedButton3: TSpeedButton;
SpeedButton4: TSpeedButton;
SpeedButton5: TSpeedButton;
SpeedButton6: TSpeedButton;
SpeedButton7: TSpeedButton;
SpeedButton8: TSpeedButton;
Bevel1: TBevel;
Bevel2: TBevel;
lblDataPortBit: TLabel;
lblNoLED: TLabel;
Label1: TLabel;
Label2: TLabel;
Label3: TLabel;
procedure
SpeedButton1Click(Sender: TObject);
procedure
FormCreate(Sender: TObject);
private
procedure
KirimDataKePort(DataPortBit: Byte);
public
{ Public declarations }
end
;

var
Form1: TForm1;

implementation

{$R *.DFM}

uses
Math;

const
AlamatPort = $378;

procedure
TForm1.KirimDataKePort(DataPortBit: Byte);
var
Nilai: Byte;
begin
lblDataPortBit.Caption := IntToStr(DataPortBit);
lblNoLED.Caption := 'LED No. ' + IntToStr(DataPortBit + 1) +
' Nyala';
Nilai := Trunc(Power(2, DataPortBit));
asm
MOV DX, AlamatPort
MOV AL, Nilai
OUT DX, AL
end
;
end
;

procedure
TForm1.SpeedButton1Click(Sender: TObject);
begin
(* Put the 8 pieces TSpeedButton, set propeti Tag
of 8 with the value TSpeedButton
0 to 7. From the Object Inspector,
directed event Clik from all TSpeedButton
the SpeedButon1Click. *)


KirimDataKePort((Sender as TSpeedButton).Tag);
end
;

procedure
TForm1.FormCreate(Sender: TObject);
begin
KirimDataKePort(0);
end
;

end
.

Read More......

Kamis, 18 Februari 2010

Tips and trick (part 2)

Source Code for Validation Program using Visual Basic 6.o, If you tertatik Tips and Tricks with Visual Basic is Please Read below ...

Only numbers can be input in TextBoxt :

Private Sub txtNomor_KeyPress(KeyAscii As Integer)
If Not (KeyAscii >= Asc("0") & Chr(13) _
And KeyAscii <= Asc("9") & Chr(13) _
Or KeyAscii = vbKeyBack _
Or KeyAscii = vbKeyDelete _
Or KeyAscii = vbKeySpace) Then
Beep
KeyAscii = 0
End If
End Sub

Only Letter :

Private Sub txtNama_KeyPress(KeyAscii As Integer)
If Not (KeyAscii >= Asc("a") & Chr(13) _
And KeyAscii <= Asc("z") & Chr(13) _
Or (KeyAscii >= Asc("A") & Chr(13) _
And KeyAscii <= Asc("Z") & Chr(13) _
Or KeyAscii = vbKeyBack _
Or KeyAscii = vbKeyDelete _
Or KeyAscii = vbKeySpace)) Then
Beep
KeyAscii = 0
End If
End Sub

All cleaning TextBox Control and Combo Box :

Sub Clear()
For Each Control In Me.Controls
If TypeOf Control Is TextBox Then
Control.Text = ""
End If
If TypeOf Control Is ComboBox Then
Control.Text = ""
End If
Next Control
End Sub

NB: if there is another key condition plus live in IFnya aja, and to disable all the buttons to stay instead of "Control.Text = Enabled" wrote

Get Auto Number :

Private Sub Auto()
Dim Urutan As String * 10
Dim Tgl As String
Dim Hitung
Set TMasuk = New ADODB.Recordset
TMasuk.Open "Select * from Masuk", Persediaan, adOpenDynamic, adLockPessimistic
'TMasuk.MoveFirst
Tgl = Format(Now, "yy/mm/dd")
With TMasuk
If .RecordCount = 0 Then
Urutan = Right(Tgl, 2) + Mid(Tgl, 4, 2) + Left(Tgl, 2) + "0001"
Else
.MoveLast
If Left(![No Masuk], 6) <> Right(Tgl, 2) + Mid(Tgl, 4, 2) + Left(Tgl, 2) Then
Urutan = Right(Tgl, 2) + Mid(Tgl, 4, 2) + Left(Tgl, 2) + "0001"
Else
Hitung = (![No Masuk]) + 1
Urutan = (Right(Tgl, 2) + Mid(Tgl, 4, 2) + Left(Tgl, 2)) + Right("0000" & Hitung, 4)
End If
End If
txtNomor = Urutan
End With
End Sub

Read More......

Rabu, 17 Februari 2010

Tips and trick (part 3)

Knowing is connected to the Internet or not :

Public Declare Function InternetGetConnectedStateEx Lib “wininet.dll” Alias “InternetGetConnectedStateExA” _
(ByRef lpdwFlags As Long, _
ByVal lpszConnectionName As String, _
ByVal dwNameLen As Long, _
ByVal dwReserved As Long _
) As Long

Public Enum EIGCInternetConnectionState
INTERNET_CONNECTION_MODEM = &H1&
INTERNET_CONNECTION_LAN = &H2&
INTERNET_CONNECTION_PROXY = &H4&
INTERNET_RAS_INSTALLED = &H10&
INTERNET_CONNECTION_OFFLINE = &H20&
INTERNET_CONNECTION_CONFIGURED = &H40&
End Enum

Public Property Get InternetConnected( _
Optional ByRef eConnectionInfo As EIGCInternetConnectionState, _
Optional ByRef sConnectionName As String _
) As Boolean
Dim dwFlags As Long
Dim sNameBuf As String
Dim lR As Long
Dim iPos As Long
sNameBuf = String$(513, 0)
lR = InternetGetConnectedStateEx(dwFlags, sNameBuf, 512, 0&)
eConnectionInfo = dwFlags
iPos = InStr(sNameBuf, vbNullChar)
If iPos > 0 Then
sConnectionName = Left$(sNameBuf, iPos – 1)
ElseIf Not sNameBuf = String$(513, 0) Then
sConnectionName = sNameBuf
End If
InternetConnected = (lR = 1)
End Property

Read More......

Tips and trick (part 1)

This section provides various tips and tricks used to apply programming in Visual Basic version 6.0.

Character Password (*)

You must already know that in certain applications that use passwords, text boxes are used to fill the password always bring the star character (*) if you type something into it. This of course meant that no one else can read the actual characters you type. To create a text box to remove the character * (or even other characters) is very easy to do, namely to fill in the characters you want on the property PasswordChar text box control. After that if you type something into the text box, then the characters that will appear is the character that you enter into the PasswordChar property.


Center Screen

Often if your application is run, the location of the application form on the monitor screen is not settled. Sometimes on the top left, sometimes in the middle, sometimes at the bottom. For those of you who like cleanliness, maybe this will seem annoying. There is an easy trick for an application form are always situated in the middle of the screen, if executed, that is by changing the properties StartUpPosition into 2 - CenterScreen, or form an image right click on the Form Layout window, select Startup Screen Position ® Center.


Default Size Control

To add a control to the form, you use click and drag the mouse to form the control in the form. If you want to use a control with the default size, then there is a faster way, ie double-click the control icon. Automatically in the form will be added to control the default size. While the position of course still have to set it manually.

If you are a Visual Basic user starting from the early versions, you must know that the display IDE (Integrated Development Environment) or the display window of the Visual Basic 6.0 differs from previous versions. You can change the look of the IDE Microsoft Visual Basic 6.0 to resemble the previous versions by clicking Tools ® Options menu. Select the Advanced tab, enable the check box SDI Development Environment. Exit the Visual Basic 6.0, then run again. Display the Visual Basic 6.0 IDE will change


Adding Images In the Command Button

So far, you always use the Caption on the Command Button. You can also add pictures on the Command Button to add your application appeal. For that there are some properties that need to be changed, namely:

Property Value

Style 2 - Graphical

Caption [You can clear these properties]

Picture [Pictures to be added to the Command Button]

DownPicture [Image in Command Button when clicked]

Example:

Make a form, add a Command Button and change its properties as follows:

Property: Value

Style: 2 - Graphical

Caption: [blank]

Picture: C: \ Windows \ Cursors \ No_l.cur

DownPicture: C: \ Windows \ Cursors \ No_m.cur

For Picture and DownPicture property, if the cursor files are given in the example does not exist on your computer, you can replace yourself with another file.

Run your application, consider what happens if the Command Button is clicked.


PopUp Menu

Sometimes you want to display a menu by right-clicking on an object. Menu like this is called PopUp Menu. It's easy. Make a menu with the menu editor, then turn off options that are visible in the dialog box editor menu. That must be considered is, the choice is only visible to non-active menutitle its course, while for each menuitem, this visible option must remain active. Then use the mouse down event on the object you want to show the PopUp Menu, then add the following syntax:

PopUpMenu menutitle

Remember, by using the mouse down event, which mouse button is clicked can be captured by taking a particular value of the parameter button. To the right mouse button, button parameter value is 2.

Example:

Make a form, add menus and Picture Box control into it. Fill up the menu and your image. Do not forget to disable the check box visible in the menu editor to menutitle it. In the picture box control to add code as in listing 1.

Listing 1. MouseDown Event in Picture1

Private Sub Picture1_MouseDown (Button As Integer, Shift As Integer, X As Single, Y As Single)

If Button = 2 Then

PopupMenu mnuFile

End If

End Sub

Run the application. A menu will appear when you right-click the Picture Box control.


Editing Some Controls Together

To edit multiple controls at once, using a combination of shift + click or ctrl + click to activate the option on some controls.

For example, consider Figure 2. In the drawing, the three Command Button on the form are located too close to the left. To move to the middle of all three at once, select the Command Button is third with a combination of shift + click or ctrl + click. After that you can move the control all three at once.


Tab Order

Sometimes for one thing we can not use the mouse in operating an application, such as the mouse is defective. So we had to use the keyboard in running an application. Or maybe our application is an application used in the store cashier who was deliberately not given a mouse. In circumstances where we have to use the keyboard, then to move from one control to another control that we use the tab key. For it in designing a form, we also need to adjust the control sequence to be active if the tab key is pressed. To set the sequence very simple way, namely by adjusting the TabIndex property of each control. Which directly controls the focus if the application is run will have a TabIndex 0, then if we hit the tab key, then the next active control with TabIndex is 1, and so on.

For certain cases, the use of the tab key to move from one control to another control is not efficient, and to replace the desired tab button enter key. To replace the tab key to enter, the tricks that can be used is to use the KeyPress event. KeyAscii value to enter is 13. If the value is met keyAscii 13, then the next control that wants to become the focus should be subject setfocus methods.


Adding a Control Array In The Run-Time

Generally we add controls to the form when designing these forms (at design time), but Visual Basic also provides the facility to increase the number of control array at run-time by using the Load statement.

Example:

Make a form and add a Command Button. Change property Indexnya with numbers 0.

Into the Command Button is added as the program code listing 2.

Listing 2. Click on Command1 Event

Private Sub Command1_Click (Index As Integer)

Load Command1 (1)

Command1 (1). Left = Command1 (0). Left

Command1 (1). Top = Command1 (0). Top + Command1 (0). Height

Command1 (1). Caption = "New Command"

Command1 (1). Visible = True

End Sub

Note that the procedures have Command1_Click Index As Integer parameters that must be added.

Run the application. If the Command Button is clicked, it automatically added a new Command Button directly below.

Well, hopefully the tips and tricks for helping you to create applications with Visual Basic.

Read More......

Selasa, 16 Februari 2010

KNOWN VISUAL BASIC (Part 6)

1.1. Creating Project Manage Property

Example 5:

Create a new project with StandardEXE to try playing with the property and the event even further. Add Label components, Text, Frame, OptionButton, checkbox and Command. Set looks like Figure 2.7 below:

Figure 2.7. Example 2.2 preview exercises


When using the display in the frame, the frame must be made in advance of new components in it. Set the properties of each component such as table 2.2. follows:
Table 2.2 Settings 2.2 exercise property

These settings will be generated display applications such as in Figure 2.8 below.
Figure 2.8. Display for exercise 2.2

Click on the command1, add code so that the program becomes:

Private Sub Command1_Click ()

Label2.Caption = Text1.Text

End Sub

Click on command2, add code so that the program becomes:

Private Sub Command2_Click ()

End

End Sub

Click on Option1, add code so that the program becomes:

Private Sub Option1_Click ()

Label2.ForeColor = vbRed

End Sub

Label2.ForeColor is color property to change the text on Label2, and red vbRed is already provided by Visual Basic, for the other colors like blue using vbBlue. Click on Option2, add code so that the program becomes:

Private Sub Option2_Click ()

Label2.ForeColor = vbBlue

End Sub

Click on check1, add code so that the program becomes:

Private Sub Check1_Click ()

Label2.FontItalic = Check1.Value

End Sub

Click on check2, add code so that the program becomes:

Private Sub Check2_Click ()

Label2.FontBold = Check2.Value

End Sub

Label2.FontItalic the property to set whether the text in italics Label2 made or not, if the value True then the text into italics. Label2.FontBold the property to set whether the text in bold Label2 made or not, if the value True then the text becomes bold. Save the project with the name projectLatihan22. And run the program, enter the name of Achmad Basuki, set the text to be red and tilted like a picture 2.9.2.8. Display for exercise 2.2

Read More......

Senin, 15 Februari 2010

Creating Media Player

You can create various multimedia applications in VB that could play audio CD, audiofiles, VCD , video files and more.


To be able to play multimedia files or multimedia devices, you have to insert Microsoft Multimedia Control into your VB applications that you are going to create. However, Microsoft Multimedia Control is not normally included in the startup toolbox, therefore you need to add the MM control by pressing Ctrl+T and select it from the components dialog box that is displayed.

19.1 Creating a CD player

In this program, you can create a CD player that resembles an actual CD player. It allows the user select a track to play, to fast forward, to rewind and also to eject the CD. It can also display the track being played. The interface and code are shown below


The Code

Private Sub Form_Load()
'To position the page at the center
Left = (Screen.Width - Width) \ 2
Top = (Screen.Height - Height) \ 2
'Initialize the CD
myCD.Command = "Open"

End Sub


Private Sub myCD_StatusUpdate()


'Update the track number
trackNum.Caption = myCD.Track
End Sub

Private Sub Next_Click()
myCD.Command = "Next"
End Sub

Private Sub Play_Click()
myCD.Command = "Play"

End Sub

Private Sub Previous_Click()
myCD.Command = "Prev"
End Sub

Private Sub Stop_Click()
myCD.Command = "Stop"
End Sub

Source : http://www.vbtutor.net

Read More......

KNOWN VISUAL BASIC (Part 5)

1.1. Event With Program Code

Visual programming is event-driver, which means that the program works based on events that occur when a given object instance action button is pressed, the selected option, or after typing something in the text and in the press [Enter]. To make this event live click on the components of the user interface display that was made.

Example 3:

In the example 2, click on the form (the blanks are not used any other components), then the display will appear as shown below 5:

Figure 2.5. Display for program code

Consider drawing 2.5, while in-form will appear click the Load event, is due to the default event for the form is loaded. And automatically in the source code for functions already provided in the form load event is written:

Private Sub Form_Load ()

End Sub

In this function written in program code. This program code is run when the form is called. This event can be replaced in the [Event], note that the event in every component, including numerous forms, live selected according to application needs.

Example 4:

In the example 2, click on the command1, hence the event on the program code as follows:

Private Sub Command1_Click ()

End Sub

Add the program to the source code is that it becomes:

Private Sub Command1_Click ()

Label2.Caption = Text1.Text

End Sub

This program means that what is typed in text1 will be displayed at Label2. Then click on command2, and add code so that the program becomes:

Private Sub Command2_Click ()

End

End Sub

End command, meaning the program out and completed. Save the form and this project by way of select menu [File]>> [Save Project], give the name of the form and name of the project formLatihan21 with projectLatihan21. Run by pressing the Run icon () on the toolbar. Enter a name such as "Achmad Basuki" in text1, and press the Ok button. The result is as Figure 2.6 berikut.2.5. Display for program code
Figure 2.6. The results of the exercise program 2.1

Read More......

Minggu, 14 Februari 2010

Download e-book

Tutorial VB connect to MySQl
Tutorial VB for Beginner (Indonesian Language)

Read More......

KNOWN VISUAL BASIC (Part 4)

1. EVENTS AND PROPERTY

1.1. Creating User Interface

Programming Visual Basic is a visual programming, where it conducted the program using visual media, or often referred to as user-interface. Which means that creating the program generated by the program view, the program code (scripts) are placed each component.

Example 1:

Create a new project with StandartEXE to make a simple user interface with components involving Label, Textbox and a CommandButton on the Toolbox on the left side of the interface such as Visual Basic 2.1 and image Figure 2.2 below:


Figure 2.1. Components used

Use the components as in Figure 2.1 to create a form in the figure 2.2. follows:

Figure : 2.2
To set the location live using "drag & drop" with the mouse. This program is not finished because it is still necessary arrangements and additional event properties in each component to provide an acceptable display by the user and can run the process.

1.1. Set the Property

Property on the display the Visual Basic interface is located on the right, as Figure 2.3 below:

Figure 2.3

In example 1 above, the components used are Label1, Label 2, text1, Command1 and Command2. Set the properties of each component is as follows, thus producing an image display as 2.4. Table 2.1. Property settings for example 2 :

Results form after the set is propertynya:
Figure 2.4. Results show an example form 2

Each component has different properties and numerous, but there are some properties that are often used in each component, among others [Caption]. Property is often used to form include:

• Name: declare the name of the object is a very useful form to call and save the form.

• Caption: used to give the title to the form.

• StartUpPosition: used to put the form when the form is called or active. There are four choices are: Manual, CenterOwner, CenterScreen, Windows Default,


Read More......

Sabtu, 13 Februari 2010

KNOWN VISUAL BASIC (Part 2)

1.1. Basic Concepts Programming In Visual Basic 6.0
The basic concept of Visual Basic 6.0 programming, is the creation of forms by following the rules of programming Property, Method, and Event. This means:
Property: Each component in the Visual Basic programming properties can be adjusted according to application needs. Property that should not be forgotten in every component is "Name", which means that a variable (component) that will be used in scripting. Property "Name" can only be arranged through the Property window, while the other values of bias peroperti regulated through the script like
Command1.Caption = "Play"
Text1.Text = "Visual Basic"
Label1.Visible = False
Timer1.Enable = True ·
Method: The course of the program can be adjusted in accordance with the application programming method is set as the action of each component. This method to express the programming logic of making an application prgram.
Event: Every component may act through the event, such as the event click on the button command is written in the script Command1_Click screen, or the Mouse Down event on the picture is written by Picture1_MouseDown. Setting event in every component that will run all the methods are made.

1.2. Creating New Project To begin the application program in Visual Basic, which is done is create a new project. Project is a collection of forms, modules, functions, data and reports used in an application. Creating a new projrct can be done by selecting the menu [File]>> [New Project] or by pressing the icon [new project] vb31pada Toolbar located at the top left corner. After that will come for the type of project confirmation from yan application programs will be made as shown in the figure 1.3. follows.

Visual Basic 6.0 provides 13 types of projects that can be made as shown in the picture above 1.3. There are several projects that used by many users of Visual Basic, among others:
· Standard EXE Project in Visual Basic standard with standard components. This type of project is very simple, but has the advantage that all components can be recognized by all computers and all users, although not an administrator. In this book will use Standard EXE project is, as the concept of visual programming.
· ActiveX EXE: This Project is project contains ActiveX components intuk ability to interact with all the applications on windows operating system.
· ActiveX DLL: This project resulted in a library application can then be used by all applications in windows operating system.
· ActiveX Control: Project is to produce new components for Visual Basic applications other
· VB Application Wizard: This project guides the user to create applications easily without having to bother with programming commands.
· Addin: Project such as the Standard EXE, but with a variety of additional components that enable creation of user freedom.
· Data Project: This project complements components with the database components. That is to say this project was provided for the purpose of creating database applications.
· DHTML Application: Project is used to create Internet applications on the client side (client side) with DHTML functions.
IIS Application: this project generate on the internet apliaksi server side (server side) with the components of the CGI (Common Gateway Interface). Then select Standard EXE and press [Ok]. Then came the display of the Standard Exe as in figure 1.1. Thus the project is ready made. In a previous project making double click on the form that made it invisible hidden window (hidden windows) is a window for making the program or the windows code (code windows). This can be done by selecting icons or windows form window of an existing code in the [Project Explorer]. This can be seen in the figure 1.4 and Figure 1.5

figure 1.4

Figure 1.5

Read More......

KNOWN VISUAL BASIC (Part 3)

In the form window, the user in building a view of the application programs will be made by adjusting the components of a good location, property and eventnya. To retrieve a component of the [Toolbox] can be done with the click components, then clik or pull in the correct position on the form. For example take the label from the Toolbox can be done in a way like Figure 1.6 below:


Figure 1.6

The steps to take labels from the toolbox to be paired in the form are as follows:

1. Click the icon [label] in [ToolBox]

2. Move to a position where the label will be placed

3. Clik and drag until it was right then release

Note:

Do not forget to set the property name of each component used, because the name is the identity of the object to be used in writing programs.

The next step is to provide the text on the label, say "Hello world", then piliha Caption property, and fill with Hello World. Results show the program is as follows:

Figure 1.7 : Layout

And to run the program click the Run icon () on the toolbar or select the [Run]>> [Start], or to press the [F5]. So that the results of the program are:


Figure 1.8. The program

Read More......

Jumat, 12 Februari 2010

KNOWN VISUAL BASIC (Part 1)

1.1. Know Your Visual Basic 6.0
Basic language is essentially a language that is easily understood so that programming in the Basic language can easily be done even by someone who was just learning to program. This is even easier after the presence of Microsoft Visual Basic, which was built from an idea to make the language simple and easy to manufacture scriptnya (simple scripting language) for the graphic user interface developed in Microsoft Windows operating systems.
Visual Basic is a programming language that is very easy to learn, with visual programming technique that allows users to create better in producing an application program. This is seen from the bottom of it in visual basic is FORM, where the user can set the display of the form and then run the script that is very easy. The blast marked the use of Visual Basic to Visual Basic's ability to interact with other applications in the Windows operating system with the ActiveX Control component. With this component allows penguna to call and use all existing data models in the windows operating system. This is also supported by programming techniques in Visual Basic which adopt two types of programming Visual programming and Object Oriented Programming (OOP).
Visual Basic 6.0 actually progress from previous versions with several additional components that are current trends, such as Internet programming capability to DHTML (Dynamic HyperText Mark Language), and several additional features and multimedia database, the better. Until the time of writing can be said that the Visual Basic 6.0 is still the first select in the making existing application programs in the national software market. This is due to the ease in the development process of applications made.

1.2. Interface Interface Visual Basic 6.0

Interface interface Visual Basic 6.0, with menus, toolbars, toolbox, forms, project explorer and properties as shown in figure 1.1. follows:

Application programming using Visual Basic is done by making an application to the form view, and given the script in the program components required. Form prepared by the components in the [Toolbox], and every component that is used to set the property through the window [Property].

The menu is basically the standard operating in the windows operating system, such as creating a new form, create a new project, open the project and save the project. In addition there are facilities on the use of visual basic menus. For more details, Visual Basic provides a very detailed assistance and detail in the MSDN.

Toolbox contains the components that can be used by an active project, meaning the contents of the toolbox components depends on the type of project is built. Standard component in the toolbox can be seen in Figure 1.2 below.

Read More......

Kamis, 11 Februari 2010

VB Basics 1: What is VB (Visual Basic)?

Like PHP, Visual Basic is a programming language that is easy to learn and this tutorial will lead you to enter the world of VB to enjoy. With Visual Basic, you can ngembangin applications and games based on Windows.
Visual Basic is much easier to learn than other programming languages (such as Visual C + +) but still a programming language is very powerful.

Interested? Read this tutorial aja further.
Visual Basic is more suitable for development than the development of gaming applications. You can aja make an amazing game using Visual Basic, but if you want to make games more sophisticated professionals such as Quake 2, then you probably would prefer to use other languages (like C + +), which must be much more difficult to use.
However, Visual Basic is already very adequate to meet the needs of almost all dangame application programming you want.

Advantages of Visual Basic:
- Language is simple. Many things may be difficult , we use other programming languages, will be done easily by using Visual Basic.
- Because Visual Basic is very popular, so very many resources you can use to learn and develop the skills you're either in the form of books, web sites, etc. (of course one of them is http://prothelon.com J). With many of these sources, then of course you will be very easy to find answers to problems that you face right?
- You can get a lot of good free tools on the Internet or not that will really help you save time in programming. For example, if you want to create a program to ping one computer on your network, instead of making it his own ping program, you can donlot a control that do this and stick it in your program. When compared with other languages, Visual Basic have a variety of the most widespread tools .

Disadvantages of Visual Basic:
- Visual Basic is a powerful programming language, but it is not too good to make games that really satisfy.
- More slower than other programming languages.

Read More......

Rabu, 10 Februari 2010

Microsoft Visual Basic 6.0: Create Invisible Window

Clear and translucent that a dictionary defines the word transparent. Yes, something that makes transparent clear what is behind him. That's what happens when the application window that is made transparent. Usually the active application window appearance will not overwrite the current window. But now we will try to make a window application with Visual Basic 6.0 so that the transparent inactive windows visible clearly.

How to manufacture the following:

1. Open the Visual Basic 6.0 application via [Start]> [All Programs]> [Microsoft Visual Studio 6.0]> [Microsoft Visual Studio 6.0].

2. In the New Project window, select the New tab.

3. On the New tab, choose Standard EXE and click [Open] to open the window Project1 - Form1 (Form).

4. klik [View] >


The CODE:
  1. untuk membuka jendela Project1 – Form1 (Code)

  2. 5. Ketikkan kode program berikut ini :

  3. [code]Option Explicit
  4. Private Declare Function GetWindowLong Lib "user32" Alias "GetWindowLongA" _
  5. (ByVal hWnd As Long, ByVal nIndex As Long) As Long
  6. Private Declare Function SetWindowLong Lib "user32" Alias "SetWindowLongA" _
  7. (ByVal hWnd As Long, ByVal nIndex As Long, ByVal dwNewLong As Long) As Long
  8. Private Declare Function SetLayeredWindowAttributes Lib "user32" _
  9. (ByVal hWnd As Long, ByVal crKey As Long, ByVal bAlpha As Long, ByVal _
  10. dwFlags As Long) As Long
  11. Private Const WS_EX_LAYERED As Long = &H80000
  12. Private Const LWA_ALPHA As Long = &H2
  13. Private Const GWL_EXSTYLE = (-20)
  14. Sub TembusPandang(lhWnd As Long, level As Integer)
  15. On Error GoTo keluar

  16. Call SetWindowLong(lhWnd, GWL_EXSTYLE, GetWindowLong(lhWnd _
  17. , GWL_EXSTYLE) Or WS_EX_LAYERED)
  18. Call SetLayeredWindowAttributes(lhWnd, 0, (level * 255) / 100, LWA_ALPHA)

  19. keluar:
  20. End Sub

  21. Private Sub Form_Load()
  22. TembusPandang Me.hWnd, 50
  23. End Sub
6. To see the results stored and run by pressing [F5].

In TembusPandang Me.hWnd program code, 50 means the window is made with a transparent level of 50%. Now try changing the numbers 50 to 100. Thus, the effect of invisibility on the window disappeared and returned to normal. Then if we change them to 0, then all the windows are not visible. Please note, translucent effect like this can only be done on the OS Windows 2000 / XP or higher. Good luck!

Read More......

Selasa, 09 Februari 2010

Tutorial Visual Basic

Visual Basic (VB) is an ideal programming language for developing sophisticated professional applications for Microsoft Windows. It makes use of Graphical User Interface for creating robust and powerful applications. The Graphical User Interface as the name suggests, uses illustrations for text, which enable users to interact with an application. This feature makes it easier to comprehend things in a quicker and easier way.


Coding in GUI environment is quite a transition to traditional, linear programming methods where the user is guided through a linear path of execution and is limited to small set of operations. In GUI environment, the number of options open to the user is much greater, allowing more freedom to the user and developer. Features such as easier comprehension, user-friendliness, faster application development and many other aspects such as introduction to ActiveX technology and Internet features make Visual Basic an interesting tool to work with.

Visual Basic (VB) was developed from the BASIC programming language. In the 1970s, Microsoft started developing ROM-based interpreted BASIC for the early microprocessor-based computers. In 1982, Microsoft QuickBasic revolutionized Basic and was legitimized as a serious development language for MS-DOS environment. Later on, Microsoft Corporation created the enhanced version of BASIC called Visual Basic for Windows.

Visual Basic (VB) is an event-driven programming language. This is called because programming is done in a graphical environment unlike the previous version BASIC where programming is done in a text only environment and executed sequentially in order to control the user interface. Visual Basic enables the user to design the user interface quickly by drawing and arranging the user elements. Due to this spent time is saved for the repetitive task.

Important Features of Visual Basic (VB)

  • Full set of objects - you 'draw' the application
  • Lots of icons and pictures for your use
  • Response to mouse and keyboard actions
  • Clipboard and printer access
  • Full array of mathematical, string handling, and graphics functions
  • Can handle fixed and dynamic variable and control arrays
  • Sequential and random access file support
  • Useful debugger and error-handling facilities
  • Powerful database access tools
  • ActiveX support
  • Package & Deployment Wizard makes distributing your applications simple

Visual Basic 6 vs Previous versions of Visual Basic

The original Visual Basic for DOS and Visual Basic For Windows were introduced in 1991.

Visual Basic 3.0 (a vast improvement over previous versions) was released in 1993.

Visual Basic 4.0 released in late 1995 (added 32 bit application support).

Visual Basic 5.0 released in late 1996. New environment, supported creation of ActiveX controls, deleted 16 bit application support.

Visual Basic 6.0 - released in mid 1998s - some identified new features of Visual Basic 6.0:

  • Faster compiler
  • New ActiveX data control object
  • Allows database integration with wide variety of applications
  • New data report designer
  • New Package & Deployment Wizard
  • Additional internet capabilities.

If you ever used Visual Basic 3, you too could have known everything. Visual Basic 3 was a reasonably small but powerful language. Visual Basic 4 added classes to the language and made Visual Basic much more complicated. Versions 4, 5, and 6 added more support for database programming and other topics such as custom controls, but Visual Basic was still a fairly understandable language, and if you took the time you could become an expert in just about all of it.

Visual Basic.NET accelerated the expansion of Visual Basic tremendously. The .NET Framework added powerful new tools to Visual Basic, but those tools came at the cost of increased complexity. Associated technologies have been added to the language at an ever - increasing rate, so, today, it is impossible for anyone to be an expert on every topic that deals with Visual Basic.

System requirements for Visual Basic depends on the version of Visual basic software. Visual Basic 6 for windows requires at least Microsoft Windows 95/Windows NT 3.51, 486 processor and a minimum of 16 MB of RAM. A complete installation of the most powerful version of Visual Basic 6.0, the Enterprise Edition, requires more than 250 MB of Hard Disk space.

Freetutes.com has Visual Basic Tutorials explained with examples and source code. This online Visual Basic tutorials are intended for programmers of all levels. Whether you are a beginner or and advanced VB learner you are absolutely here at the right place to learn what you really should learn. (You will currently find only Visual Basic 6 tutorials. We are working on to provide you with Visual Basic.NET tutorials and more other IT related tutorials covering programming, databases, networking, web development etc. Check back now and then for updated and new lessons from Freetutes.com)

Read More......

BlogCatalog

My Sponsor